Creating a Build for Capture and Automation
When TestSweets is integrated into an application the application can be in two states.
- Capture Mode: In this mode you have the TestSweets capture UI where you can add your automation points to screen
- Drive mode: The app has to be in this mode for TestSweets to run the automation tests.
Swapping between the two builds
TestSweets has the ability to swap between the two modes in the app.
When you’ve installed a build with a TestSweets integration you bring up the mode swap UI in the following two ways:
- Tap with three fingers on screen
- Long tap on the route indicated in the top left corner (grep block with some your route name in it)
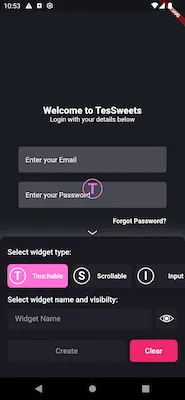
The mode swap UI looks as follows:
You can then select the other mode, and you’ll see a message to restart the app for the mode to take affect.

When you restart the app it will now be in the mode that you selected. You can do a triple finger tap to confirm which mode it’s in, and do another triple finger tap to hide the banner
Forcing into capture mode on emulator or simulator
When you’re running the TestSweets UI from code, and not an installed APK you can force the capture mode to show up on emulator. This helps because you can’t three finger tap on an emulator.
When you run, you can add the following dart define.
--dart-define=FORCE_CAPTURE_MODE=trueCreating builds for your testers
When you want to send a build to testers to automate simply build your app in debug mode. Below are the commads for the different platforms.
Android
flutter build apk --debugiOS - Simulator
flutter build ios --debug --simulatoriOS - Real Device
flutter build ios --debugThe tester can use the same build to do the capturing as well as running the tests.